Camera Settings
Guide to Photobooth Camera Settings
Photobooth
Camera Settings
A Practical Guide
Chalkak Studio Blog
Introduction
There are a lot of different ways that your photo booth can stand out from the competition, one of them being the good photo results.
Specification of camera is one factor that affects the result, but what is also important is to set up the camera & environment adequately. Time to share our tips on these!
You can follow the Chalkak Studio camera setting guide (provided in the user manual after purchase) for the basic setups. On top of that, these are the factors that can be adjusted for better photobooth camera settings.
Key Factors
Lighting, We will dive into this in more detail in another post!
Shutter Speed, How fast the shutter closes. A higher number means a faster speed, perfect for capturing fast-moving subjects.
Light Sensitivity (ISO), The camera’s sensitivity to light. Lower ISO produces darker, cleaner images; higher makes brighter pictures with potential noise.
White Balance, Helps you achieve the desired color tone in your photos.
Aperture
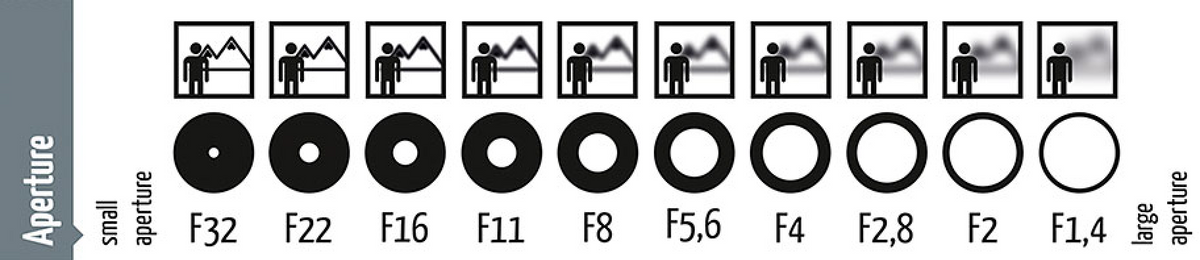
Aperture controls the amount of light that passes through the lens. A wider aperture lets in more light, resulting in brighter photos, while a narrower aperture reduces light, making photos darker.
Have you seen photos where the background is blurred? Those are taken using aperture settings! A higher aperture number means a smaller aperture, suited for regular photos, whereas a lower number means a wider aperture, ideal for creating out-of-focus backgrounds (bokeh effect).
Tip! A higher F-number (small aperture) decreases the size of the light entry, slowing the shutter speed, which can cause blur if the camera shakes. Reduce the F-value if blur occurs.
Shutter Speed & ISO


Shutter Speed
Shutter speed literally refers to how fast the shutter closes. A higher number means a faster speed, perfect for capturing fast-moving subjects. A slower speed allows more light in, which is great for brighter photos.
ISO
ISO denotes the camera’s sensitivity to light and affects image quality. Lower ISO settings produce darker, cleaner images, while higher settings make for brighter pictures with potential noise.
White Balance & Final Tips
Adjusting the white balance helps you achieve the desired color tone in your photos. For a popular cool tone look, set the white balance lower to make it appear bluer. When installing lights, consider the angle of reflection to position your lights correctly.
Finding the right setting might take some trial and errors. But trust me, it is an essential part of the setup!
Cover, Page 1 of 6

Parliamone
Collabora con Monadex per realizzare il tuo prossimo progetto esperienziale.